Get started with Meadow.Blazor
Meadow.Blazor in combination with Meadow.Desktop offers an environment for developing Meadow applications that can run on Windows, Mac and Linux. Developing with Meadow.Blazor requires setting up your development machine with some prerequisites. Then, after connecting any external components, you can deploy and run your Meadow application.
Meadow Blazor enables you to combine a Blazor front-end using Blazor Server while accessing physical components by way of an FTDI breakout board such as FT232H that provides GPIO, SPI, and I2C.
Prerequisites
Before you can get started with Meadow.Blazor, make sure your development machine is set up for Meadow development.
If it is not already installed, install the .NET 8.0 SDK. You can find the latest version of the .NET SDK from the .NET downloads.
Using GPIO and SPI
With an FTDI breakout board like the FT232H, you can add GPIO and SPI capabilities to your desktop device.
Create your first Meadow.Blazor app
Create a new Blazor Server dotnet app on your development machine and navigate to the project folder.
dotnet new blazorserver -n MeadowBlazorSampleApp
cd MeadowBlazorSampleApp
Add the Meadow.Blazor NuGet package to your project.
dotnet add package Meadow.BlazorCreate a new file named
MeadowApplicationin your project with the following code:using Meadow;
internal class MeadowApplication : App<Meadow.Desktop>
{
public override Task Initialize()
{
//initialize hardware here and add to sensor service
return base.Initialize();
}
public override Task Run()
{
return base.Run();
}
}If using external hardware, you'll need to add the relevant Meadow nuget packages and initialize the drivers in the
Initializemethod:using Meadow;
using Meadow.Foundation.ICs.IOExpanders;
using Meadow.Foundation.Leds;
using Meadow.Foundation.Sensors.Atmospheric;
using Meadow.Peripherals.Leds;
internal class MeadowApplication : App<Meadow.Desktop>
{
public override Task Initialize()
{
FtdiExpanderCollection.Devices.Refresh();
var ftdi = FtdiExpanderCollection.Devices[0];
var output = ftdi.Pins.D7.CreateDigitalOutputPort(false);
Resolver.Services.Add(output);
var bme680 = new Bme680(ftdi.CreateSpiBus(), ftdi.Pins.C7);
Resolver.Services.Add(bme680);
var led = new Led(ftdi.Pins.C0);
Resolver.Services.Add<ILed>(led);
return base.Initialize();
}
public override Task Run()
{
return base.Run();
}
}Meadow.Desktop is initialized via an extension method on
WebApplicationincluded with Meadow.Blazor namedUseMeadow. CallUseMeadowin your program.cs.using Meadow.Blazor;
using Meadow.Blazor.Services;
var builder = WebApplication.CreateBuilder(args);
...
var app = builder.Build();
...
app.UseMeadow<MeadowApplication>();
...
app.Run();Build the app:
dotnet buildRun the app:
dotnet run
Access peripherals from a Blazor Server app
When structuring your Blazor Server application, a common pattern is to create view models to support Razor pages.
Below is an example to present sensor data for a BME680 atmospheric sensor.
Create a view model that exposes sensor data as public properties and includes a
StateChangedAction. Note the use ofResolver.Servicesto access the peripherals you registered inMeadowApplication.using Meadow.Foundation.Sensors.Atmospheric;
using Meadow.Peripherals.Leds;
using Meadow.Units;
namespace Meadow.Blazor.Services
{
public class SensorViewModel : IDisposable
{
private readonly Bme680 _bme680;
public string TemperatureValue { get; private set; } = "0°C";
public string HumidityValue { get; private set; } = "0%";
public string PressureValue { get; private set; } = "0atm";
public event Action? StateChanged;
public SensorViewModel()
{
_bme680 = Resolver.Services.Get<Bme680>() ?? throw new Exception("BME680 not found");
_bme680.Updated += Bme680Updated;
_bme680.StartUpdating(TimeSpan.FromSeconds(2));
}
private void Bme680Updated(object? sender, IChangeResult<(Temperature? Temperature, RelativeHumidity? Humidity, Pressure? Pressure, Resistance? GasResistance)> e)
{
TemperatureValue = $"{e.New.Temperature?.Celsius:n0}°C";
HumidityValue = $"{e.New.Humidity?.Percent:n0}%";
PressureValue = $"{e.New.Pressure?.StandardAtmosphere:n2}atm";
StateChanged?.Invoke();
}
public void Dispose()
{
_bme680?.StopUpdating();
}
}
}Create a razor page that uses the view model:
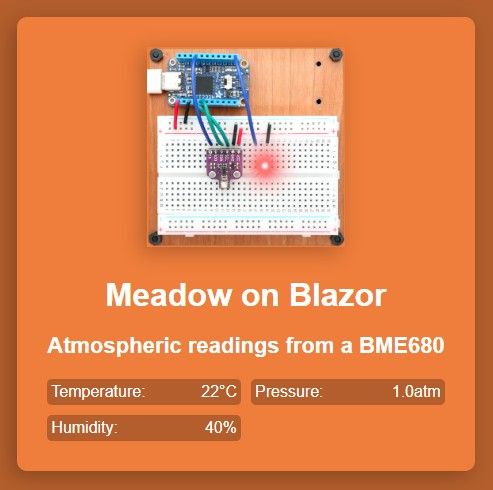
@page "/"
@inject Meadow.Blazor.Services.SensorViewModel ViewModel

<div class="container">
    <div class="content">
        <div class="image-container">
            <img src="Assets/meadow.png" alt="Meadow" />
        </div>
        <h1>Meadow Blazor</h1>
        <h2>Atmospheric readings from a BME680</h2>

        <div class="readings">
        <div class="reading">
            <span>Temperature:</span>
            <span>@ViewModel.TemperatureValue</span>
        </div>
        <div class="reading">
            <span>Pressure:</span>
            <span>@ViewModel.PressureValue</span>
        </div>
        <div class="reading">
            <span>Humidity:</span>
            <span>@ViewModel.HumidityValue</span>
        </div>
        </div>
    </div>
</div>

@code {
    protected override void OnInitialized()
    {
        ViewModel.StateChanged += OnViewModelStateChanged;
    }

    private void OnViewModelStateChanged()
    {
        InvokeAsync(StateHasChanged);
    }

    public void Dispose()
    {
        ViewModel.StateChanged -= OnViewModelStateChanged;
    }
}
Next steps
Now that you have your Meadow.Blazor project and hardware set up and your app running, you can start working with the Meadow.Foundation libraries to add additional functionality to your Meadow app. Check out the other samples in the Meadow.Desktop.Samples.