Intro
The TextDisplayMenu library is an extensible framework for quickly creating hierarchical, editable menus that can display on a display that implements ITextDisplay - any graphical display via the MicroGraphics Library or supported character display and can be driven using input devices such as buttons or rotary encoders.
The menu can be created programmatically or loaded from JSON, and has a number of built-in menu item types for display and editing input including time, temperature, and others. Additionally, you can quickly create custom menu item types that allow users to edit their value via the inputs.
Using
Before using a TextDisplayMenu you need to:
- Search and install the Meadow.Foundation.Displays.TextDisplayMenu NuGet package.
- Search and install a driver NuGet package for your target display, such as Meadow.Foundation.Displays.TftSpi or Meadow.Foundation.Displays.Lcd.CharacterDisplay.
Generally, to use TextDisplayMenu you need to:
- Configure an
ITextDisplayorµGraphicsLibraryto display the menu. - Define the menu items in JSON or programmatically using the
MenuItem,MenuPage, etc. classes. - Instantiate a new
Menuclass, passing the display object, and either the JSON or menu classes. - Wire up user inputs (such as buttons or a rotary encoder) to call
Next(),Previous()andSelect()on the menu for navigation. - Render the menu by calling
Enable().
Circuit
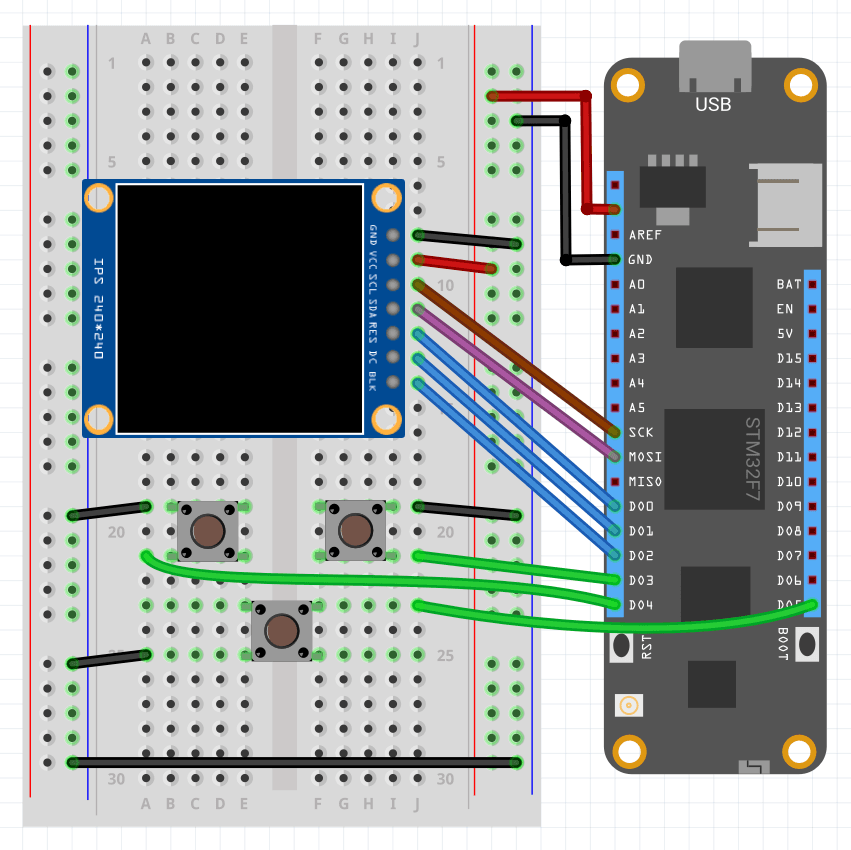
The following schematic illustrates a typical configuration for driving the menu and includes the ST7789 TFT LCD display found in the Hack Kit, as well as some simple push buttons:
Configuring the Display
TextDisplayMenu requires an ITextDisplay to render on. You can either use any of the text character displays directly, such as the 4x20 LCD Character Display in the Hack Kit, or you can can use a graphics display in conjunction with the µGraphics library, which itself implements ITextDisplay.
Defining the Menu
The menu data can be either be created programmatically in-memory or defined in JSON.
The menu items support the following properties:
| Object Property | JSON Property | Usage |
|---|---|---|
Text | text | Display text to be rendered. Include {value} to display the current value of the type |
Command | command | Command name to distinguish menu selection events. If command is set, it takes precedence over editable menu item. |
ID | id | Unique identifier for the type. Required for an editable menu item. |
Type | type | Type of the input, ex: Age, Time. Required for an editable menu item. |
Value | value | The default value for editable items. |
SubItems | sub | Array of child menu items for submenus. |
Defining a Menu Programmatically
To create programmatically, create an array of MenuItem objects which represents a page of menu choices. Optionally, you can add sub-pages of items by adding them to the SubItems property.
The following code illustrates creating a simple one page menu:
var menuItems = new MenuItem[]
{
    new MenuItem("FrogIt", command: "startFrogIt"),
    new MenuItem("Pong", command: "startPong"),
    new MenuItem("Span4", command: "startSpan4"),
    new MenuItem("Snake", command: "startSnake"),
    new MenuItem("Tetraminos", command: "startTetraminos"),
    new MenuItem("Options",
                subItems: new MenuItem[]{new MenuItem("Sound {value}", id: "sound", type: "OnOff", value: true),
                                         new MenuItem("Volume {value}", id: "volume", type: "Numerical", value: 5),
                                         new MenuItem("Clear scores", command: "clearScores"),
                                         new MenuItem($"Version {version}") }),
};
Defining a Menu in JSON
To create a menu hierarchy from JSON, you'll need to define a root node that contains an array of menu items. The following table enumerates the properties and associated usage:
For example, the following json code defines a hierarchical menu arranged in menu pages and items.
[
  {
    "text": "My Temp: {value}",
    "id": "displayTemp",
    "value": 77
  },
  {
    "text": "My Age: {value}",
    "id": "displayAge",
    "value": 12
  },
  {
    "text": "My Time",
    "id": "time",
    "type": "TimeDetailed"
  },
  {
    "text": "Edit Temp",
    "id": "temp",
    "type": "Temperature",
    "value": 77
  },
  {
    "text": "Edit Age",
    "id": "age",
    "type": "Age",
    "value": 12
  },
  {
    "text": "Parent",
    "sub": [
      { "text": "Child 1" },
      { "text": "Child 2" },
      { "text": "Child 3" }
    ]
  },
  {
    "text": "My Command",
    "command": "DoSomething"
  },
  { "text": "Quit" },
  { "text": "Item 7" },
  {
    "text": "Item 8",
    "sub": [
      { "text": "Sub Item A" },
      { "text": "Sub Item B" },
      {
        "text": "Sub Item C",
        "sub": [
          { "text": "Sub Item D" },
          { "text": "Sub Item E" },
          { "text": "Sub Item F" }
        ]
      }
    ]
  },
  { "text": "Item 9" },
  { "text": "Item 10" },
  { "text": "Item 11" },
  {
    "text": "Item 12",
    "sub": [
      { "text": "Sub Item X" },
      { "text": "Sub Item Y" },
      { "text": "Sub Item Z" }
    ]
  }
]
Adding the Menu JSON as a Resource
To add the JSON file to the project as a resource:
- Right-click the project and select Properties
- Click
Resourcesin the left pane - Click
Add Resourceand choose the appropriate file
Instantiating the Menu
Once the menu hierarchy is created and the display is configured, the menu can be instantiated by passing the display and menu hierarchy:
// loading from an in-memory object graph:
menu = new TextDisplayMenu(display, menuItems);

// loading from JSON
var menuData = LoadResource("menu.json");
menu = new Menu(display, menuData);
...

byte[] LoadResource(string filename)
{
    var assembly = Assembly.GetExecutingAssembly();
    var resourceName = $"Displays.TextDisplayMenu_Sample.{filename}";

    using (Stream stream = assembly.GetManifestResourceStream(resourceName))
    {
        using (var ms = new MemoryStream())
        {
            stream.CopyTo(ms);
            return ms.ToArray();
        }
    }
}
Handling Events
The menu raises events when a command is select, menu item is edited, and the menu is exited.
Selection Events
To get notified when a menu item with an assigned command is selected, assign a handler to the Selected event:
menu.Selected += (s, e) =>
{
    Debug.Print("menu selected: " + e.Command);
};
Exit Event
If the menu is not the desired application launch screen, then the menu can be programmatically can be loaded or unloaded by using Enable() or Disable(), respectively. Additionally, there is an optional parameter when instantiating a new Menu, showBackOnRoot, and when set to true, "< Back" displays as the first item on the root level and when selected, an Exited event will be raised.
To get notified when the menu is exited, assign a handler to the Exited event:
menu.Exited += (s, e) =>
{
    Debug.Print("menu exited");
    menu.Disable();
};
Edit Events
To get notified when a edit menu item value has changed, assign a handler to the ValueChanged event:
menu.ValueChanged += (s, e) =>
{
    Debug.Print(e.ItemID + " changed with value: " + e.Value);
};
Built in Types
The following table enumerates the built-in menu item types, and their associated usage and values:
| Type | Description |
|---|---|
Age | An integer value between 0 and 200 |
Boolean | A list type including True and False |
Date | International date YYYY:MM:DD |
Numerical | An integer value between 0 and 10 |
OnOff | A list type including On and Off |
Temperature | A integer value between -100 and 200 |
Time | 24 hour military time with HH:MM |
TimeDetailed | 24 hour military time with HH:MM:SS |
TimeShort | 24 hour military time with MM:SS |
Creating Custom Menu Item Types
There are two ways to create custom menu items. The easiest and most common is to inherit from, and modify, the built-in base types. However, you can also create completely custom menu item types.
Customizing Built-In Base Types
TextDisplayMenu includes a number of built-in base types that handle common types and can be customized to suit:
| Base Type | Description |
|---|---|
NumericBase | Provides a generic numeric display and input. The min/max, and number of decimal places can be modified. |
TimeBase | Provides an input mask of XX:XX:XX or XX:XX depending on the mode. |
ListBase | Provides a selectable list of items. |
Custom NumericBase Example
The following code is pulled from the Age menu type, and illustrates how to inherit from NumericBase and specify the floor, ceiling, and scale of the desired input.
namespace Meadow.Foundation.Displays.TextDisplayMenu.InputTypes
{
    public class Age : NumericBase
    {
        public Age(): base(0, 100, 0) { }
    }
}
Custom ListBase Example
The following code is pulled from the Boolean menu type, and illustrates how to inherit from ListBase and define the desired list values, in this case true and false.
namespace Meadow.Foundation.Displays.TextDisplayMenu.InputTypes
{
    public class Boolean : ListBase
    {
        public Boolean()
        {
            choices = new string[2];
            choices[0] = "True";
            choices[1] = "False";
        }
    }
}
Creating custom types
Creating a custom type is a bit more involved, but achievable. To start, inherit from InputBase and build out the implementation for the following methods:
protected abstract bool Previous();
protected abstract bool Next();
protected abstract bool Select();
To see working examples, check out the implementations for NumericBase and ListBase
Troubleshooting
We experienced periodic problems with the display outputting nonsense data:
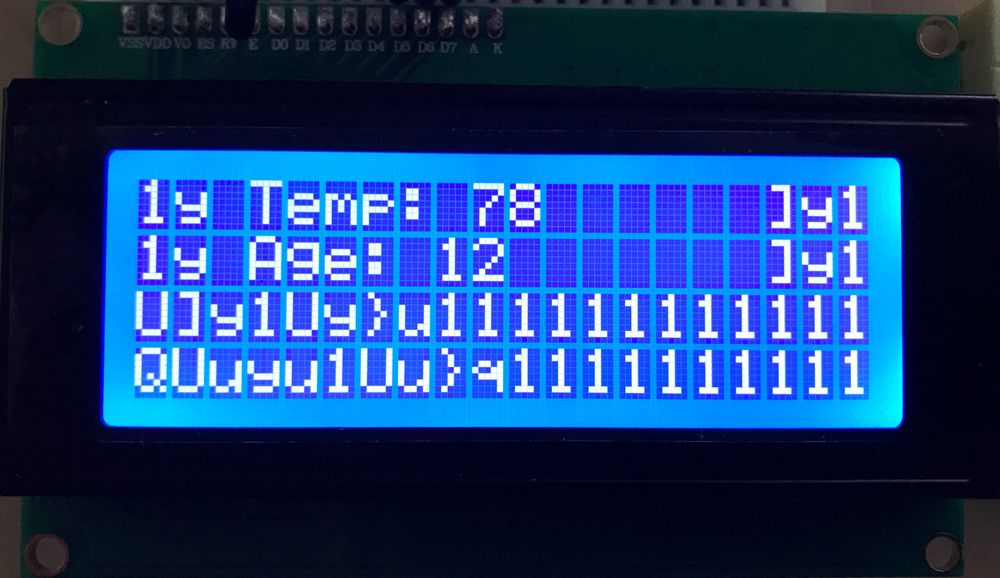
To resolve, check that are the connections are securely in place and/or use a different breadboard.
Sample Apps
For complete sample code, check out the Meadow.Foundation Libraries and Frameworks Samples. Optionally, you can out check this project uploaded on Hackster.
 | Build an Interactive Menu with TextDisplayMenu Using Meadow |