Hello, Meadow!
Once Meadow.OS has been deployed to your board, you can create and deploy Meadow apps to it.
The video below shows you how to create and deploy your first Meadow app on a Mac:
Alternatively, you can follow this step by step guide for Visual Studio on both macOS and Windows or Visual Studio Code on macOs, Windows, or Linux.
Go to the instructions for your development system and IDE
- Visual Studio 2022 on Windows
- Visual Studio 2022 on macOS
- Visual Studio Code on macOS, Windows, or Linux (Debian, Ubuntu)
Visual Studio 2022 on Windows
Step 1: Install Visual Studio Meadow Extension
Prerequisites
You'll need Visual Studio 2022 for Windows.
You can use any edition including Enterprise, Professional, or the free Community edition.
Important: Make sure to include the .NET Multi-platform App UI development component (or Mobile Development with .NET in older versions of Visual Studio) when installing Visual Studio.

Install the Meadow Extension
You'll need to install the VS Tools for Meadow Extension by downloading it or through the Extension Manager
- In Visual Studio, go to Extensions > Manage Extensions.
- Click Online and search for
Meadow. - Install VS Tools for Meadow, shut down all instances of Visual Studio, and restart.
Step 2: Create a new Meadow Project
- Open Visual Studio 2022.
- Click Create a new project.
- Search for
Meadow(make sure to clear all filters). - Select Meadow Application and press Next.
- Name your project
HelloMeadowand choose project location. - Press Create.
Step 3: Deploy your Application
The Meadow application template is a simple application that will pulse the onboard LED. As long as the Meadow.OS is deployed to your Meadow board, you can use the same techniques to deploy a Meadow application as you would any other .NET application:
- Connect your Meadow device to your development machine
- Right-click anywhere in the toolbar area and you'll see Meadow Device List in the dropdown. Click on it and it will be added to your toolbar. (Alternatively, you can show the list from the View > Toolbars > Meadow Device List menu entry.)
- Select the Meadow device COM port that correspond to your board in the Meadow Device List toolbar dropdown
- Right-click project in Solution Explorer and choose Deploy.
- Wait 30-60 seconds for your application to start
Understanding the Hello, World App
Your "Hello, World" app should be running on your Meadow device.
Visual Studio 2022 on macOS
Step 1: Install Visual Studio Meadow Extension
Prerequisites
You'll need Visual Studio 8.10.xx or 2022 for Mac.
You can use any edition including Enterprise, Professional, or the free Community edition.
Important: Make sure to include the .NET Multi-platform App UI development component (or Mobile Development with .NET in older versions of Visual Studio) when installing Visual Studio.
Install the Meadow Extension
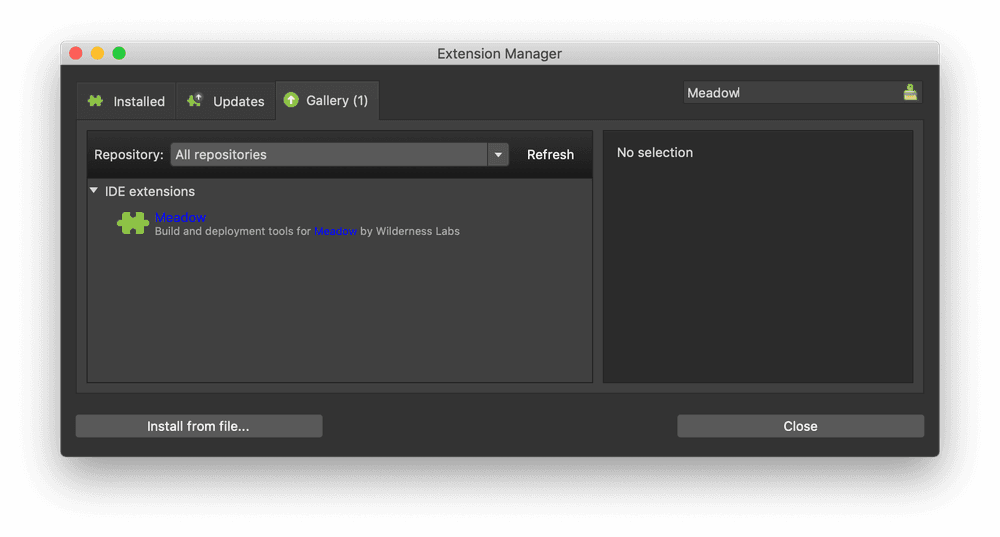
You'll also need to install the Meadow IDE Extension for Visual Studio for Mac.
- On the menu go to Visual Studio -> Extensions.
- Click the Gallery tab.
- Search for
Meadow. - Select the Meadow IDE extension.
- Click Install...
Known issue when updating the Meadow Extension on MacOS
Occasionally, when updating the extension, or if you install the extension manually from file, Visual Studio for Mac will end up with a corrupt extensions database and you may have more than 1 Meadow extension installed. The extension will not work correctly if this happens.
To fix this do the following:
- Shut down Visual Studio for Mac.
- Within Finder, go to
~/Library/Caches/VisualStudio/17.0/for VS2022 (use Command+Shift+G` to get a path entry that you can paste this path into). - you should see a
addin-db-*directory. Delete it. - Restart Visual Studio for Mac. It will then recreate the addin-db-* directory from scratch. VS will take a little longer to start-up.
Step 2: Create a new Meadow Project
- Open Visual Studio.
- Create a new Project: File -> New Solution...
- In the Meadow section, select Meadow Application and press Next.
- Name your project
HelloMeadowand choose project location. - Press Create.
Step 3: Deploy your Application
The Meadow application template is a simple application that will pulse the onboard LED. As long as the Meadow.OS is deployed to your Meadow board, you can use the same techniques to deploy a Meadow application as you would any other .NET application:
- Connect your Meadow device to your development machine
- Press the Play button in Visual Studio to compile and deploy your application
- Wait 30-60 seconds for your application to start
Understanding the Hello, World App
Your "Hello, World" app should be running on your Meadow device.
Visual Studio Code on macOS, Windows, or Linux (Debian, Ubuntu)
Step 1: Install Visual Studio Meadow Extension
Prerequisites
You'll need Visual Studio Code. Visual Studio Code is available for macOS, Windows, and Linux with several CPU architectures supported across those platforms.
Install the Meadow Extension
You'll also need to install the Meadow extension for Visual Studio Code. This extension works across all supported platforms.
- Switch to the Extensions icon in the Visual Studio Code Activity Bar on the left. (Alternatively, you can select the View > Extensions menu item.)
- Search for
Meadowin the Extensions: Marketplace search bar. - Select the Meadow extension.
- Select Install from the Meadow extension details.
Step 2: Create a new Meadow Project
To create new Meadow projects for development, debugging, and deploying in Visual Studio Code, you will create a project using the command line.
Open a command line terminal on your desired platform. You can also open Visual Studio Code and open the Terminal panel it offers.
Within the terminal, navigate to the desired location where you want to create the new Meadow project, such as
MeadowApp1.If you haven't previously, run the following
dotnet new installcommand to install the available Meadow templates onto your system.dotnet new install WildernessLabs.Meadow.TemplateRun
dotnet new Meadowto create an initial Meadow "Hello, World" app.Alternatively, you can also directly specify the folder where your new project will be created by appending the
--outputparameter to your command.dotnet new Meadow --output MeadowApp1
Step 3: Deploy your Application
- Open your new Meadow app folder in Visual Studio Code.
- Ensure your Meadow board is plugged in and up-to-date.
- Choose Run > Start Debugging. (Your code will automatically be built first.)
- From the list of debugging providers, choose
Meadow. - If prompted, select the serial port for your Meadow board.
- Wait 30-60 seconds for your application to start.
Visual Studio Code troubleshooting
Change your target Meadow device
After selecting the device deployment target the first time, the selected serial port value will be used for future deployments. If you want to change which device is targeted for deployment, select the Select Device status item in the bottom status bar or run the Meadow: Select Device command. This will open the prompt to select a different connected Meadow device.
![]()
Specify a .NET Version
Depending on your system configuration and installed .NET versions. You may need to add a global.json file to your project's directory to tell it to use .NET 6.0:
"sdk": {
    "version": "6.0.101",
    "allowPrerelease": false,
    "rollForward": "latestMinor"
}
Maintain your debug configuration
Optionally, you can also create a launch.json file to keep your debug configuration, instead of always running it dynamically. Select the Debug icon from the Visual Studio Code Activity Bar on the left, and use the button to create a launch.json file. Choose Meadow again from the list, and the default launch settings will be created for you.
{
  "version": "0.2.0",
  "configurations": [
    {
      "name": "Deploy",
      "type": "meadow",
      "request": "launch",
      "preLaunchTask": "meadow: Build"
    }
  ]
}
Understanding the Hello, World App
Your "Hello, World" app should be running on your Meadow device.
Understanding the Hello, World App
The Meadow app template has one file: MeadowApp.cs. Let's take a quick look at that file.
MeadowApp.cs
Meadow will automatically scan for a class that implements IApp and launch it for you.
Let's take a brief look at the MeadowApp class:
using Meadow;
using Meadow.Devices;
using Meadow.Foundation;
using Meadow.Foundation.Leds;
using Meadow.Peripherals.Leds;
using System;
using System.Threading;
using System.Threading.Tasks;

namespace HelloMeadow
{
    // Change F7FeatherV2 to F7FeatherV1 for V1.x boards
    public class MeadowApp : App<F7FeatherV2>
    {
        RgbPwmLed onboardLed;

        public override Task Initialize()
        {
            Console.WriteLine("Initialize hardware...");

            onboardLed = new RgbPwmLed(device: Device,
                redPwmPin: Device.Pins.OnboardLedRed,
                greenPwmPin: Device.Pins.OnboardLedGreen,
                bluePwmPin: Device.Pins.OnboardLedBlue,
                CommonType.CommonAnode);
            return base.Initialize();
        }

        public override Task Run()
        {
            CycleColors(TimeSpan.FromMilliseconds(1000));
            return base.Run();
        }

        void CycleColors(TimeSpan duration)
        {
            Console.WriteLine("Cycle colors...");

            while (true)
            {
                ShowColorPulse(Color.Blue, duration);
                ShowColorPulse(Color.Cyan, duration);
                ShowColorPulse(Color.Green, duration);
                ShowColorPulse(Color.GreenYellow, duration);
                ShowColorPulse(Color.Yellow, duration);
                ShowColorPulse(Color.Orange, duration);
                ShowColorPulse(Color.OrangeRed, duration);
                ShowColorPulse(Color.Red, duration);
                ShowColorPulse(Color.MediumVioletRed, duration);
                ShowColorPulse(Color.Purple, duration);
                ShowColorPulse(Color.Magenta, duration);
                ShowColorPulse(Color.Pink, duration);
            }
        }

        void ShowColorPulse(Color color, TimeSpan duration)
        {
            onboardLed.StartPulse(color, (duration / 2));
            Thread.Sleep(duration);
            onboardLed.Stop();
        }
    }
}
Meadow Namespaces
Let's break down parts of this class into pieces. First, the Meadow namespaces:
using Meadow;
using Meadow.Devices;
using Meadow.Foundation;
using Meadow.Foundation.Leds;
using Meadow.Peripherals.Leds;
These are the typical minimum set of namespaces in a Meadow app class and provide the following functionality:
Meadow- The root namespace contains Meadow application and OS classes, enabling you to interact with the Meadow.OS.Meadow.Devices- Contains device-specific definitions for different Meadow boards, such as the F7 Feather V1 and V2 dev boards, or the F7v2 Core-Compute module.Meadow.Foundation- Meadow.Foundation is a set of open-source peripheral drivers and hardware control libraries that make hardware development with Meadow, plug-and-play.Meadow.Foundation.Leds- Provided with the Meadow.Foundation library. Used to simplify use of RGB LEDs in this sample.Meadow.Peripherals.Leds- Provided with the Meadow.Contracts library. Used to access LED type enumeration.
MeadowApp Class Definition
Notice that the HelloMeadow application class inherits from App, and has one generic arguments, in this case F7FeatherV2:
public class HelloMeadow : App<F7FeatherV2>
All Meadow applications should inherit from the App base class. Under the hood, Meadow.OS will look for a class in your code inheriting from IApp, such as the App implementation, and launches the app automatically. It also provides hooks for getting notified during system events, such as the board being put to sleep.
App requires one parameter: the current device definition. This is passed in to provide a strongly-typed reference to the current device.
The device class defines properties and capabilities of the current device, such as the pins. While your app is running, your code can access the current device from the Device property on the Resolver class, allowing you to access them using autocomplete, via the specific device type:
Device.Pins.OnboardLedRed
public override Task Run()
{
    CycleColors(TimeSpan.FromMilliseconds(1000));
    return base.Run();
}
From your app, Meadow.OS will call the Initialize() method, described below, for any setup code. Meadow will then call the Run() method which calls the CycleColors method with a duration of 1000 milliseconds.
Controlling the Onboard LED via Ports
Direct access to hardware Input/Output (IO) is generally available via ports and buses. In this case, Meadow.Foundation is doing that work for us and we are accessing an RgbPwmLed from the pins we tell it to use. In this case, we use Meadow's on-board pulse-width modulated LED light with three sub-component LEDs that are red, green, and blue:
RgbPwmLed onboardLed;
...

public override Task Initialize()
{
    Console.WriteLine("Initialize hardware...");

    onboardLed = new RgbPwmLed(device: Device,
        redPwmPin: Device.Pins.OnboardLedRed,
        greenPwmPin: Device.Pins.OnboardLedGreen,
        bluePwmPin: Device.Pins.OnboardLedBlue,
        CommonType.CommonAnode);

    return base.Initialize();
}
The Initialize call writes to the console for informational purposes, useful when debugging and watching your app start. Then RGB LED is then created from the device itself, using the named Pins connected to the on-board LED available on the particular device specified above in the App definition.
Digital Output
To pulse the color of the light emitted via the onboard LED, we can utilize the built in StartPulse() method of the RgbPwmLed class, this is done in the ShowColorPulse method, which takes a color and duration. All of this is tied together with the CycleColors call which will simply cycle through a variety of colors:
void CycleColors(TimeSpan duration)
{
    Console.WriteLine("Cycle colors...");

    while (true)
    {
        ShowColorPulse(Color.Blue, duration);
        ShowColorPulse(Color.Cyan, duration);
        ShowColorPulse(Color.Green, duration);
        ShowColorPulse(Color.GreenYellow, duration);
        ShowColorPulse(Color.Yellow, duration);
        ShowColorPulse(Color.Orange, duration);
        ShowColorPulse(Color.OrangeRed, duration);
        ShowColorPulse(Color.Red, duration);
        ShowColorPulse(Color.MediumVioletRed, duration);
        ShowColorPulse(Color.Purple, duration);
        ShowColorPulse(Color.Magenta, duration);
        ShowColorPulse(Color.Pink, duration);
    }
}

void ShowColorPulse(Color color, TimeSpan duration)
{
    onboardLed.StartPulse(color, (duration / 2));
    Thread.Sleep(duration);
    onboardLed.Stop();
}
Next
Now that you understand the basics of a Meadow application, we recommend learning about the following topics: